Feeds:
Posts
Comments

Archive for August, 2015

Apple Love

I am not sure how much more I can take, I can barely hold on. The hot Texas sun wears on me and I am suffocating from it.  My heart longs for my beloved fall and I hold on to hope that it is just around the corner. I grasp for it prematurely and create moments to bring me closer to it.

It’s almost here. . . It’s almost here . . .

It’s not quite apple time, but I seize an opportunity when Azure has apples for sale. I can not help myself and I go for it. I hear it everywhere, “It’s not time for apples.”

But I take the plunge anyway and my apples come and I spend the day with my apples.

Ginger Gold are these apples. A little different than what I am used to and everyone reminds me again, “Well, it’s just not time for apples.” But I am determined.  The Ginger Gold apples have a soft texture with a tart taste.

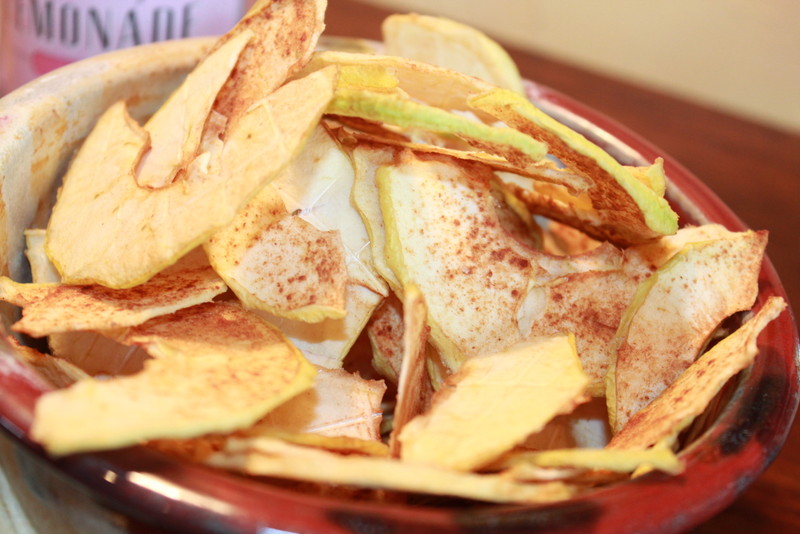
I started with one of my favorites, dehydrated apples. After all, my children got me a dehydrator for my birthday last year and I haven’t had the opportunity to use it.

IMG_2747

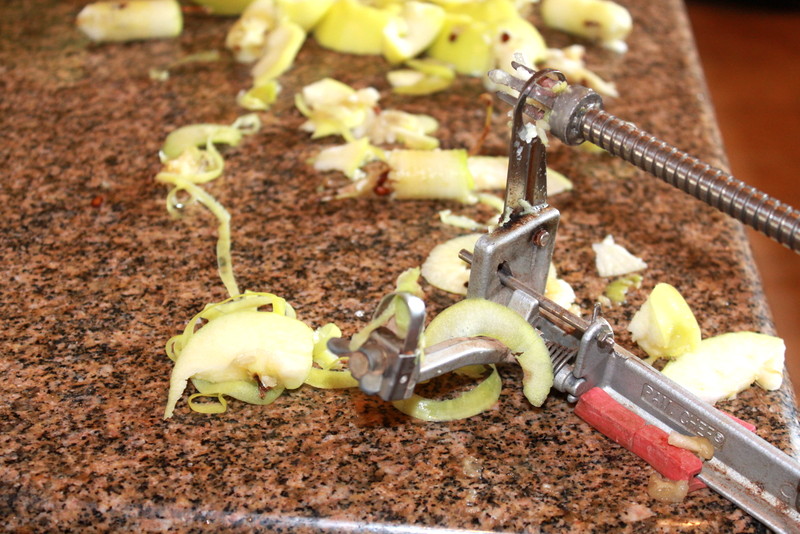
I pull out my handy dandy apple peeler, slicer, and corer. But they were too soft to peel or slice, so I settled for just coring the apples, then I sliced them by hand with a knife.

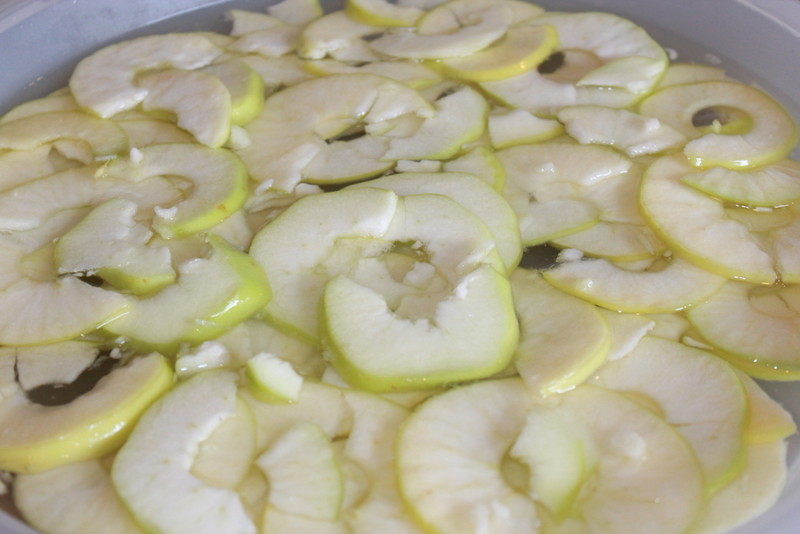
I soak them in distilled water and citric acid for a few minutes, sprinkled them with organic cinnamon and put them in the dehydrator for about 6 hours. The house smelled amazing!

IMG_2746IMG_2748IMG_2750IMG_2752

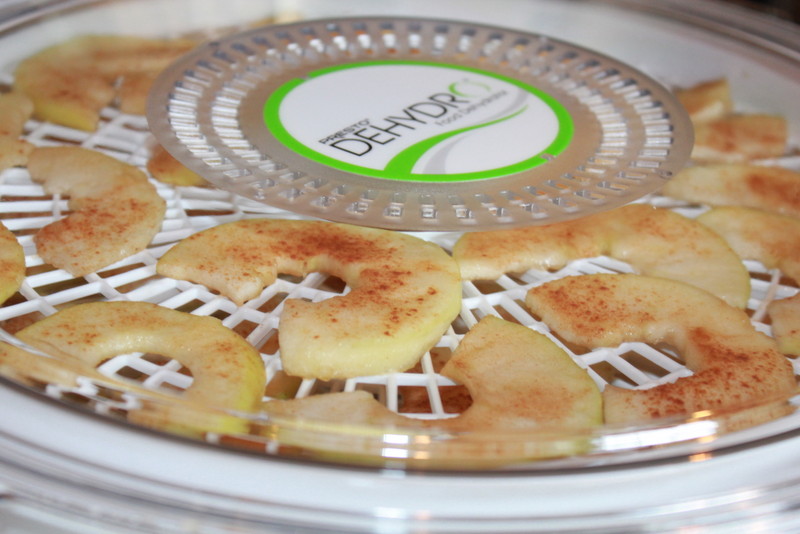
Let me just say that I love, love, love this dehydrator. Purchased at Amazon here.

The apples however is a bit of a different story. That little tart kick turned into very sour apples. The girls didn’t like it, too sour for them, but their daddy liked them.

IMG_2756IMG_2757

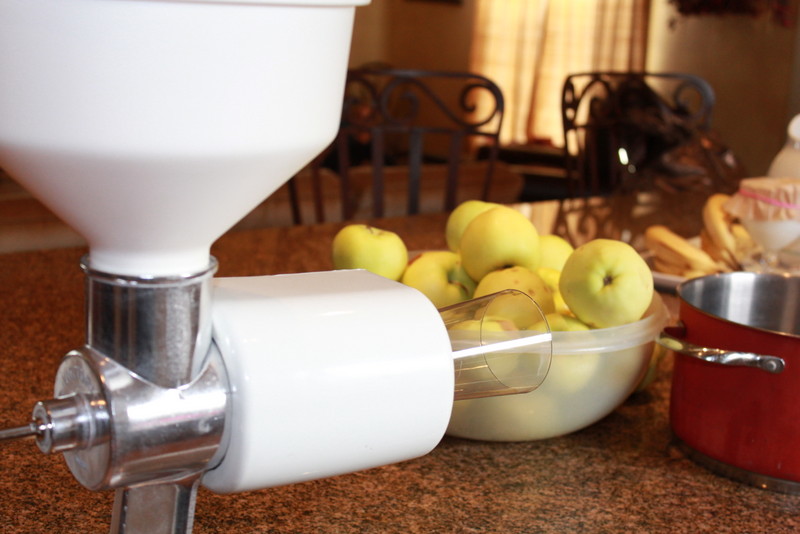
My next apple project was to make applesauce. I had little hope of it turning out very edible for the girls. I was sure it was going to be too sour for them, but I could not let my apples go bad.

Another wonderful gift from my kids, the Food Strainer, Sauce Maker, also purchased from Amazon here.

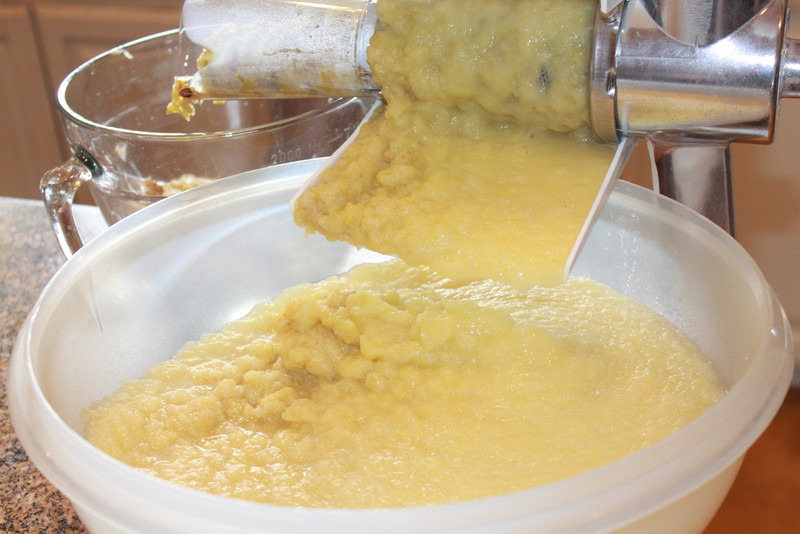
This is the coolest thing ever and I had so much fun using it. It was hard physically for me to put it together, my son-in-law had to do the strong arm stuff, but I did manage to take it apart alone.

IMG_2760

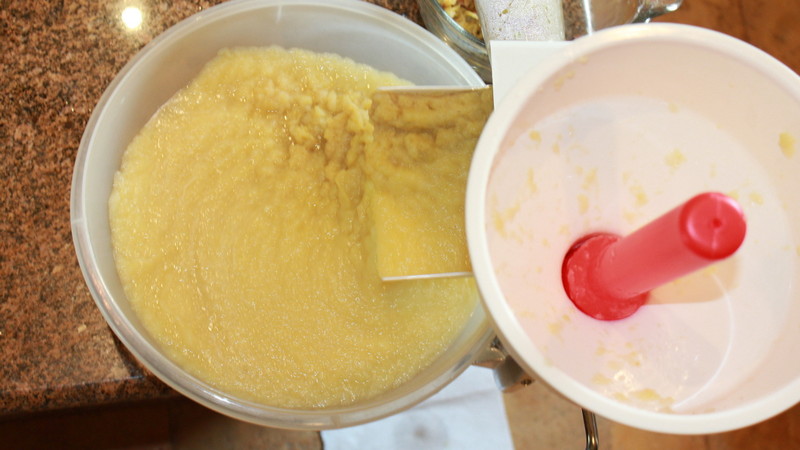
I cut the apples in fourths, cutting out the bad parts and bruises, put them in a pot and covered them with distilled water. I cooked them for about 20-30 minutes, then put them in a colander to drain the excess water.

IMG_2769

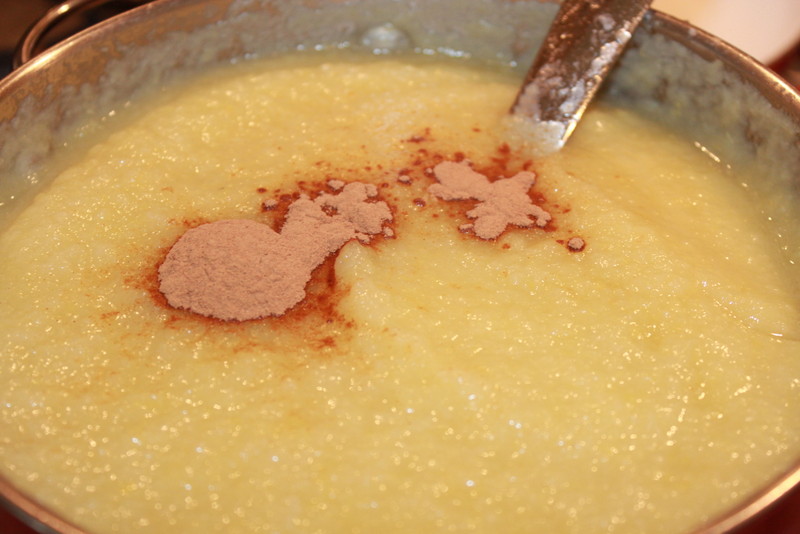
You simply put the apples in the top bowl and crank the handle.  Apple sauce comes out one side and all the trash-skin, seeds, core-comes out another side.

IMG_2762IMG_2766IMG_2764IMG_2772IMG_2770IMG_2768

Next I put the apple sauce back into the pot and added sugar. For the amount that I had I added 1 cup or organic sugar. I also added 1 heaping teaspoon of organic cinnamon. I cooked it until it was hot and bubbly, making sure everything was mixed together.

IMG_2777IMG_2778

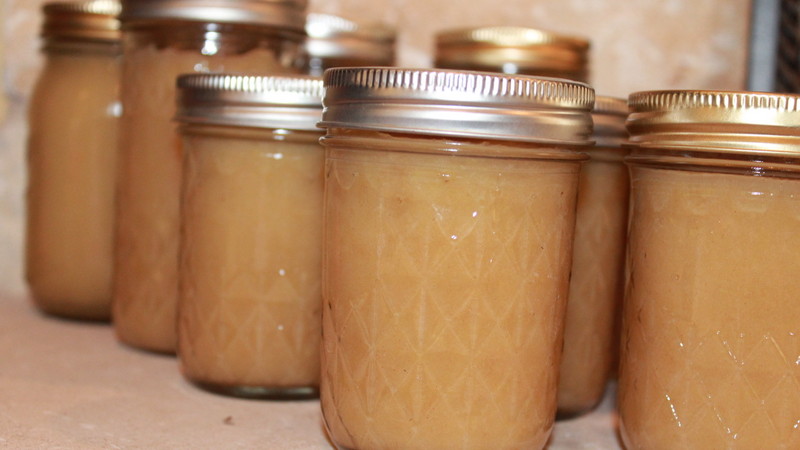
l had already prepared my jars and lids by boiling them in water to sterilize them. While they were still hot I spooned the hot apple sauce into the jars filling them up almost to the top. I left about an 1/2 inch at the top.

IMG_2780

l boiled them in a water bath for about 30 minutes, then I just sat back and listened to the lids pop. A wonderful sound.

I did sample the applesauce and I was pleasantly surprised! It tasted amazing. It was not too tart after all.

IMG_2781

IMG_2786

There were a few apples left that were beginning to get some bad spots, so I cut those out and made apple crisp for supper.

Absolute apple love

IMG_2789

IMG_2791

Keep me as the apple of the eye; Hide me in the shadow of Your wings.  Psalms 17:8

Read Full Post »

Bird Study

Aniyah definitely has the gift of enthusiasm. The smallest things bring her so much joy and excitement, and it is so contagious. Everything holds so much wonder for her. IMG_1365IMG_1373IMG_1376IMG_1383IMG_1386IMG_1393IMG_1395

This summer has been very special. While mommy and Aria go to dance class each week, and gumps works late, mammy and Aniyah get to spend time alone together. For when gumps is home mammy plays second fiddle, but I don’t mind one bit, I love seeing the girls play with their gumps.

IMG_1407IMG_1410IMG_1411IMG_1416IMG_1418IMG_1422IMG_1425IMG_1434

I gather things together that I know she will love. Things that delight her little heart and I can always tell it’s true by the laughter and the giggles that burst out of her.

Painting is always at the top of her love list. Many times she will ask me if she can paint just barely through the door.

She loves birds and everything about them, sights, sounds and the the looking to the heavens to catch a glimpse of them. She cups her little hand to her ear and listens with her whole heart for the tweet. tweeting of them.

IMG_1433IMG_1434

I cherish my time with my precious girl, for I understand that each moment is a blessing from God, and I want to hold onto these memories. Taking pictures and recording our time is as much for me as it is for her. A chance for us to reach back and take in, a constant remembering through the snap shots and still frames of my journal.

IMG_1449IMG_1450IMG_1455The bird also has found a house, And the swallow a nest for herself, where she may lay her young, Even Your altars, O LORD of hosts, My King and my God.  Psalms 84:3

Read Full Post »

The Painting Lesson

My time with my girls is so precious to me. I want our time together to be memorable for them, moments that fill their hearts with warmth and love. I strive to make each visit special, filling our days with laughter, snuggles, good food and teachable experiences. I want to share my limited knowledge with them, passing along to them my joys and loves, things that bring pleasure to me, and hopefully to them also.

IMG_2481IMG_2486IMG_2488IMG_2490

Aria has been showing a great interest in art and does a good job at it. I am in no way an artist, although I do love art and I truly enjoy creating art in many forms, so I thought that art would be something that we could share and learn together.

IMG_2494IMG_2500

I saw this picture on Pinerest and thought it would be a good painting for Aria to do. The painting was done in three layers. The first layer was the background. She mixed three colors together and painted the canvas, then went over the paint-while it was still wet-with a butter yellow.

IMG_2537IMG_2501

After the first layer was dry she used an old plastic pizza cutter taken from her play-doh box and ran it through brown paint and made the stems. She then used a small brush to make branches.

IMG_2506IMG_2509IMG_2511IMG_2513

After the second layer dried she used a sponge dabber to make her flowers.

IMG_2514IMG_2519IMG_2521IMG_2524IMG_2527IMG_2528IMG_2532

She had a lot of fun doing this painting. Part of the lesson was for her to know that little mistakes, and clumps of paint are OK.

IMG_2529IMG_2540IMG_2539IMG_2543

She gifted her mama with her masterpiece.

IMG_2545IMG_2548IMG_2550

“Do not neglect the gift that is in you, which was given to you by prophecy with the laying on of the hands of the eldership.”  1 Timothy 4:14

Read Full Post »

Vintage Pajamas

Summer has ended and school has resumed but I made one last ditch effort to sew for my girls. It was literally last minute when I sewed the last stitch, the evening before school started.

I am all about comfort and if I am home for the day you will find me in my Old Navy pajama pants and a T-shirt. In the summer it is the form of cotton with short or under the knee length. In the winter it is flannel or fleece with big fluffy slippers.

But I just can’t seem to get past the cute little pj’s of the 60’s and 70’s. I have always loved pajamas and I have a basket full of pajama patterns, mostly vintage.

So, let the pajama game begin.

IMG_2061

I love that this pattern comes in two styles, each perfect and fitting for each of my girls.

IMG_2406IMG_2418

For Aria the more slim fitting style. She does not like loose fitting clothes and this set comes with a more tailored button up top and little shorts.

IMG_2411IMG_2434IMG_2441IMG_2446IMG_2444

For Aniyah, the baby doll pajama. Even though I used the same pattern, which is a size 6, because of the elastic I was able to make it fit her. I did cut some off the bottom to make it shorter, but did not worry about reducing anything else on the top. I did adjust the bottoms a bit.

IMG_2413IMG_2409IMG_2477IMG_2416IMG_2419IMG_2422

I trimmed the sleeves and the panties with a double sided elastic trim. I just folded it in half and stretched it as I sewed.

IMG_2423IMG_2424IMG_2449IMG_2454IMG_2439IMG_2437

Aria’s fabric was purchased from JoAnn’s several years ago and I must confess that I actually cut her pajamas out last summer but never got to them.

IMG_2430IMG_2451IMG_2456IMG_2458

Aniyah’s fabric was giving to me by a very dear friend. Thank you my beloved Carey!

IMG_2461IMG_2462IMG_2464IMG_2471

Both girls loved their new pajamas. I could not have counted how many times Aria thanked me for them. Makes me want to drag everything out and start all over again.

IMG_2465IMG_2466IMG_2467

Return to your rest, my soul, for the Lord has been good to you   Psalm 116:7

Read Full Post »

Another T-Shirt Nightgown

You can find the sewing tutorial for this T-Shirt nightgown here.

IMG_1331

My girls love to change clothes when they are here, so I try to keep things in their drawer for them to wear. Aniyah’s drawer is slim pickings, so I sewed up this very simple and fast nightgown for her.

IMG_1332IMG_1335

She was very happy with it and carried it back and forth from home to mammy and gumps house for a while.

IMG_1334IMG_1336

I hand dyed the t-shirt with fabric dye a while back, so it was ready to go when I needed to use it.

IMG_1345

It was so little effort to make a little girl so happy!

IMG_1342

“They are the sons God has given me here,” Joseph said to his father.  Then Israel said, “Bring them to me so I may bless them.”  Genesis 48:9

Read Full Post »

Turning 13

The question has been in every conversation for the past few weeks. What to get our sweet Hannah for her birthday? Officially turning into a teenager tends to make the gift portion of a birthday a little challenging. No more cute little pink dresses or barbie dolls, being a teenager changes everything and your thoughts have to shift in that direction.

IMG_2154IMG_2162IMG_2165IMG_2166

We discussed her love language and what really, really mattered to her, and finally settled on a gift.

The gift of our time.

IMG_2159IMG_2164IMG_2168IMG_2167

Our plan was to take her out to dinner, so steak (her love language) at Logan’s was our first stop.

IMG_2172IMG_2174IMG_2170

Then we moved our party to the main street in Weatherford to Painting with a Twist.

IMG_2234IMG_2205IMG_2178IMG_2182

We spent the next couple of hours painting one of Hannah’s favorite things, an anchor.

IMG_2184IMG_2192IMG_2194

The class took us step by step through this painting.

IMG_2197IMG_2199IMG_2200IMG_2201

We had a couple of breaks allowing for drying time, and some photo shots of the birthday girl.

IMG_2216IMG_2217

We painted, and talked, and laughed and of course I took pictures. Sometimes we worked in silence, concentrating on fine lines and steady brush strokes.

With determination we continued on until our paintings were complete.

IMG_2223IMG_2225IMG_2229IMG_2232IMG_2237IMG_2240IMG_2244IMG_2245

Hannah’s painting.

IMG_2246

Happy Birthday to our precious Hannah! I pray that Jesus will always be the anchor of your soul, your constant hope and strength, both sure and steadfast.  We love you.

IMG_2250

so that by two unchangeable things in which it is impossible for God to lie, we who have taken refuge would have strong encouragement to take hold of the hope set before us. This hope we have as an anchor of the soul, a hope both sure and steadfast and one which enters within the veil, where Jesus has entered as a forerunner for us, having become a high priest forever according to the order of Melchizedek. Hebrews 6:18-20

Read Full Post »

A Productive Day

IMG_2075IMG_2076IMG_2078IMG_2084IMG_2091

May the favor of the Lord our God rest on us; establish the work of our hands for us– yes, establish the work of our hands.  Psalm 90:17

Read Full Post »

The Vintage Peasant

My neighbor of 34 years called a few weeks ago and asked us to come over. When we arrived at her house she was hard at work sorting and cleaning. She told me that she was going to turn 96 next month and she wanted to make sure that her fabric would go to someone who would appreciate it and use it.

So the three of us sat in one of her bedrooms that had obviously been used for her sewing room. Her sewing machine sat in front of a window, safely tucked into a sewing cabinet, the kind that looks like a single desk. Remnants of her sewing years lay scattered throughout the room. Two plastic sewing cases sat next to her machine along with a couple of bags of fabric. The room was now used for storage as she explained to us that she could no longer sew.

I went through the dresser that held her beloved fabric, drawer after drawer and Martin put the fabric in bags as I made my choices.

There were times that when I pulled out a piece of fabric her eyes would lite up, and I would see a memory splash across her face and she would say, “Let me see that one!”

I understand.

There were a lot of beautiful fabrics, but I definitely had my favorite.

The instant I pulled this fabric out I knew it was meant for Aria. It matched her bright, fun and spontaneous little personality. Happy flowers covered it with brightly colored jewel dots in each center. The soft polyester fabric had the 60’s vintage look and probably is in fact from the 1960’s, or close to it, and I knew immediately what pattern I was going to use.

IMG_2071

This 1960’s peasant dress pattern is not the first of the peasant styles. This style has been around forever and has recycled and turned up in just about every fashion era, and I have made my fair share of them.

IMG_2092IMG_2100IMG_2106

This pattern is so easy to sew up, just a few pattern pieces and just a few seams.

IMG_2112IMG_2108IMG_2110

One of the things that I love about the peasant look is the elastic around the neckline. I left a small amount of fabric above the casing to make a soft ruffle.

IMG_2113IMG_2122IMG_2129

The pattern also called for elastic at the waist but I chose to put a belt instead. My plan was to get a blingy turquoise belt, but I have not found one yet, but I am still on the lookout.

IMG_2136

IMG_2134IMG_2132IMG_2134

Aria changed the look also by adding her cowboy boots, giving it more of a western look.

IMG_2135IMG_2147IMG_2149IMG_2150

This dress will always be special because of the fabric. It will be a reminder for me of my dear neighbor and of the joyous day we sorted through her fabric.

IMG_2114IMG_2116IMG_2118

 And they mounted four rows of stones on it. The first row was a row of ruby, topaz, and emerald;  and the second row, a turquoise, a sapphire and a diamond;

Exodus 39:10-11

Read Full Post »

French Sewing Pattern

I received my very first french sewing pattern! It came from Troussures in Northern France.

IMG_1884

IMG_1885

I have always been drawn to the foreign patterns, both in the sewing and the knitting patterns. There just seems to be a classic, timeless look to them that really draws me in.

IMG_1887

I love this pattern and actually found it on Pinterest.

IMG_1888IMG_1889

It is written in French so you would need a basic knowledge of patterns and how the pieces fit together.

IMG_1890

I can’t wait to get started! I think I will start with the top for my darlin baby. I will post as soon as I finish.

IMG_1891

“Be sure that you make everything according to the pattern I have shown you here on the mountain. Exodus 25:40

Read Full Post »

Moses Baskets

Here is where I got the clever idea and instructions to make the rope baskets.

I took her idea and decided to make Moses’ baskets for my granddaughter’s Bitty Baby, it would also work for any 16″ baby doll.

You will need to purchase cloths line rope, I got mine at Walmart. The Moses basket takes around 400 feet. The cloth line rope comes in 25 or 50 feet lengths. You will also need 2-3 spools of thread to match your paint color. It takes a lot and the bigger your zigzag stitch is the more thread you will need.

I have experimented with different ways to paint the basket and I found that this is the best way for me. I dilute paint in water and stir it in, then I just soak my rope in the paint. I turn it over a couple of times to make sure it’s all coated. You can work with your paint until you are happy with how it turns out.  I used Apple Barrel paint purchased at Walmart.

IMG_1838

IMG_1837IMG_1836IMG_1832IMG_1840IMG_1842IMG_1843

I dry it outside on my cloths line.

IMG_1847

Once it’s dry you can start making your basket.

The Moses basket needs to be oblong, so I start with a 8-10 inch length of rope and sew two pieces together using a zigzag stitch, making sure to catch both pieces of rope with the thread.

You will need to position your rope so that as you sew the bulk of your basket is on the outside of your machine.

IMG_1855

Continue sewing your rope around and around until you get your desired length. My bottom is 18-19 inches long.

IMG_1856IMG_1878IMG_1875

Once you get your desired length you will turn your rope on it’s side and continue sewing. This will change the direction of your stitch and create the sides of your basket.

IMG_1800IMG_1799

Continue until you have the desired depth of your basket, then you will make the handles.

I measure and mark my four centers, then from my side centers I measure out about 2 1/2 inches on either side and mark it. I sew up to the first mark and secure the stitches really good, then I stop sewing and cut my thread. I measure a 10-12 inch length of rope and start sewing at the end of that length, starting at the next marked spot-making sure there is a 5 1/2 inch space between the two. Continue sewing around the basket until you get directly on the other side of your 5 1/2 inch space-this should also be marked-and repeat the same thing you did on the other side. I made three more rounds to make the handle of the basket. At the long end of the basket I cut the rope and folded it down and worked it into the basket. Back stitch several times to secure it down.

The bottom of my basket was a little wavy so I steamed it and ironed it until it was flat.

IMG_1892

You are now done with your Moses basket.

IMG_1812IMG_1818

You are now ready to make a pad and blanket for your basket.

IMG_1907IMG_1909IMG_1914

I use cotton fabric on one side of both the blanket and pad and on the other side I use a super soft minky fabric.

For the bottom pad: Place your basket on a long sheet of paper and trace around the bottom, marking your basket. Cut it out, adding 1/2 inch for seam allowance. Lay it on top of your desired fabric, right sides together, place 1-2 layers of batting on the bottom. Sew the layers together leaving a 4-5 inch space to turn it right side out. Trim the seam then turn it right side out. Iron your seams flat and sew along the outside edge of the pad.

For the blanket: Cut your cotton fabric and one layer of batting 18×18 inches. Cut your minky 20×20 inches. Place your minky face down, place your batting and your cotton-face up- on top of your minky, leaving 1 inch evenly around the outside edge. Double fold the minky over the cotton and pin in place, making your blanket edge. Sew the minky along all four sides.

You can quilt it either by hand of on your machine if you would like.

IMG_1912IMG_1913IMG_1908

You are now completely finished with your Moses basket.

IMG_1903IMG_1904IMG_1911IMG_1819IMG_1821

This Moses basket will be featured in my next Missions basket.

I have also made a few baskets using this technique, here are a few pictures.

IMG_1915IMG_1917IMG_1919IMG_1920IMG_8607IMG_8647

Now a man from the house of Levi went and married a daughter of Levi. The woman conceived and bore a son; and when she saw ]that he was beautiful, she hid him for three months. But when she could hide him no longer, she got him a wicker basket and covered it over with tar and pitch. Then she put the child into it and set it among the reeds by the bank of the Nile. His sister stood at a distance to find out what would happen to him.         Exodus 2:1-4

Read Full Post »

little cotton rabbits

knitting, nature and living with autism in the family

Kate Davies

Award-winning Scottish publishing and design

Dye2Spin: Your Stash Supplier

Creating Fabulous Yarn for Your Crafting Happiness

Free to Surrender

Learning to look up and let go

Christian War Journal

Fight the Good Fight, Wage the Good Warfare

wisdom of the wolf

dressing well starts inside

Prząśniczka

blog o przędzeniu i tkaniu

focusingmygaze

This is simply a place for me to record and share with others some of the things God is teaching me and doing in my life and the lives of those around me. I pray it glorifies God and encourages others.

Buzy Day

The adventure of NikkiM

leahemilynelson

Just another WordPress.com site